How to setup Traefik proxy instance with HTTPS via Cloudflare Certificates (Docker)

This post will show you how to set up a Traefik Proxy instance with SSL encryption (HTTPS) using Cloudflare certificates. All this using Docker containers and with the help of the Docker Compose tool.
Cloudflare setup
Making your domain configurable with Cloudflare
First, you must have a domain name and register with Cloudflare. Once registered, you will need to configure your domain's DNS to point to Cloudflare's (this process usually takes about 24-48 hours until propagation is complete). When the process is finished, you will be able to manage your domain from the Cloudflare dashboard.
You can check the propagation status on the web at https://dnschecker.org. However, Cloudflare usually sends you an email when the process is finished.
Adding the traefik DNS record
Once you have your domain in Cloudflare, access the DNS section. There, you must create an A record pointing to the IP of your dedicated server or VPS. Make sure that the orange cloud is visible, this means that this record is proxied by Cloudflare.
This record will be the URL through which you will access the Traefik panel: traefik.yourdomain.com

SSL and Origin Certificate
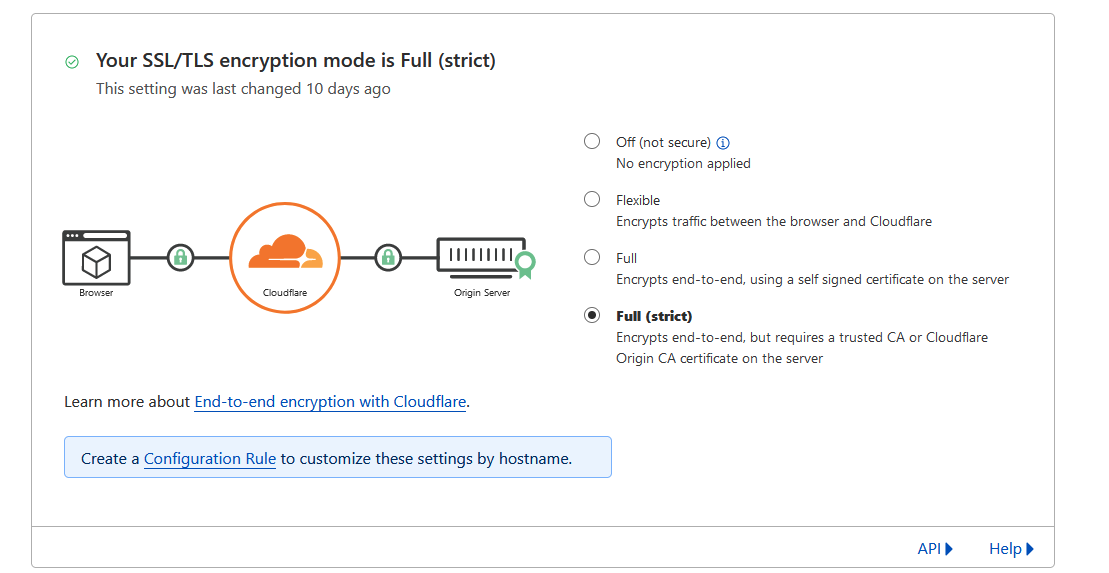
Now, navigate to the SSL section and enable Full (Strict) encryption.
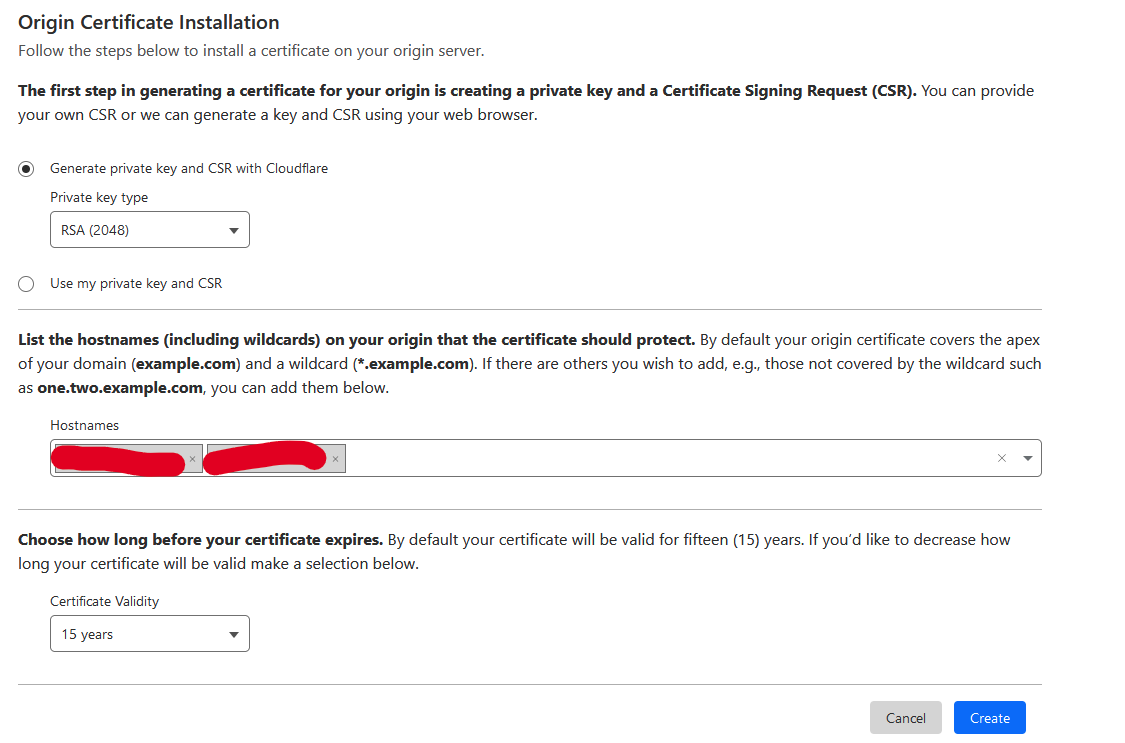
Also in the SSL section, go to the Origin Server subsection and click on the Create Certificate button.
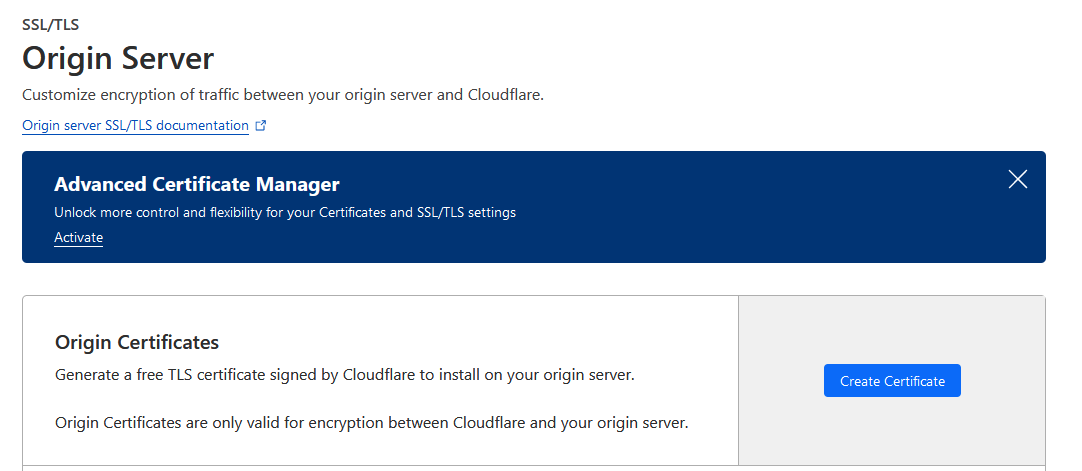
Select the type of private key and the duration of the certificate, and click on Create.
Select PEM as the key format. Here, you must copy the contents of the certificate and the key into two different files.
- yourdomain.com.crt - For the content of the certificate.
- yourdomain.com.key - For key content.
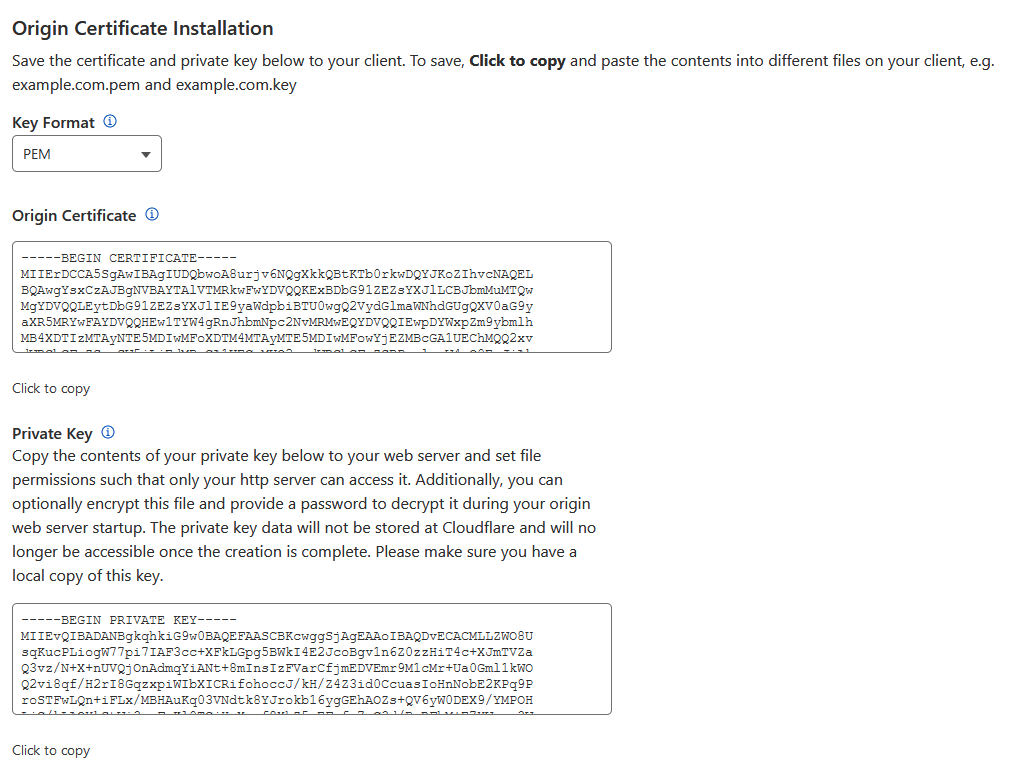
Save these files and keep them handy. And click OK.
Docker installation
I'm not going to cover Docker installation in this post, but you can visit their website for instructions: https://docs.docker.com/engine/install/
Traefik setup - Docker Compose
In the latest versions of Docker, the Docker Compose tool is included. In any case, you can check that it is installed with the following command:
docker composeNow we will create the Traefik root directory and the necessary files:
mkdir traefik
cd traefik
mkdir certs
touch certs-config.yaml
touch docker-compose.yml- traefik: Root directory.
- traefik/certs: Directory to store the certificate files and the key that you generated earlier.
- traefik/certs-config.yaml: Traefik certs dynamic config.
- traefik/docker-compose.yml: Docker services definition.
Now, let's review the contents of these files:
traefik/docker-compose.yml
This file contains the definition of all the services and containers needed to run Traefik, as well as all the Traefik configuration since it allows us to manage it with Docker Labels.
The contents of the file with explanatory comments are attached below:
version: "3.9"

services:
  traefik:
    image: traefik:v2.10
    container_name: traefik
    restart: unless-stopped
    command:
      # HTTP to HTTPS global redirection
      - "--entrypoints.web.address=:80"
      - "--entrypoints.web.http.redirections.entrypoint.to=websecure"
      - "--entrypoints.web.http.redirections.entrypoint.scheme=https"
      - "--entrypoints.websecure.address=:443"
      - "--entrypoints.websecure.http.tls=true"
      # In case you want to enable metrics, uncomment the 2 lines below
      #- "--metrics.prometheus=true"
      #- "--metrics.prometheus.buckets=0.1,0.3,1.2,5.0"
      # Traefik dashboard
      - "--api.dashboard=true" # Enable dashboard
      - "--api.insecure=false" # Public access to API (insecure)
      # Dynamic configuration file for certs
      - "--providers.file.filename=/etc/traefik/dynamic/certs-config.yaml"
      # Docker configuration
      - "--providers.docker" # Enable Docker provider
      - "--providers.docker.exposedbydefault=false" # Disable exposing all containers by default
      - "--providers.docker.network=traefik-network" # Use the traefik network
      - "--providers.docker.endpoint=unix:///var/run/docker.sock" # Docker socket
      - "--providers.docker.swarmMode=false" # Disable swarm mode
    labels:
      - "traefik.enable=true"
      - "traefik.http.routers.traefik.rule=Host(`traefik.yourdoamin.com`)"
      - "traefik.http.routers.traefik.entrypoints=websecure"
      - "traefik.http.routers.traefik.service=api@internal" # Enable API as a service
      - "traefik.http.middlewares.auth.basicauth.users=USER:PASSWORD"
      - "traefik.http.routers.traefik.middlewares=auth"
    ports:
      # Expose port 80 (HTTP) and 443 (HTTPS)
      - "80:80"
      - "443:443"
    volumes:
      # Docker socket
      - /var/run/docker.sock:/var/run/docker.sock:ro
      # Certs dynamic config
      - ./certs-config.yaml:/etc/traefik/dynamic/certs-config.yaml:ro
      # Certs dir
      - ./certs:/etc/certs:ro
    networks:
      - traefik-network
networks:
  traefik-network:
    external: true
In this file, we are declaring a service called traefik, which uses the traefik:v2.10 image (you can use any version you consider) to create the container.
The command section initializes traefik with a global redirect from HTTP (port 80) to HTTPS (port 443), enabling the dashboard and disabling public access to the API. In addition, it sets Docker as the provider and the Docker traefik-network as the primary network.
Traefik allows us to perform configurations via labels. Specifically, for this service we declare that the subdomain traefik.yourdomain.com redirects to the traefik API via HTTPS and also activates an authentication middleware so that access is not for any user.
The ports section exposes ports 80 and 443, required for HTTP and HTTPS respectively.
The volumes section allows us to bind files/directories from the host with files/directories from the container. In this case, we bind the Docker socket, the certificate configuration file and the certificate storage directory.
Finally, we declare that the container uses the traefik-network and that this is an external network.
Before we can start our container, we must create the traefik-network that we have declared in the previous file as external:
docker network create traefik-networkIn addition, we must configure our user and password for the authentication middleware. To do this, we must install the Apache2 utilities on our computer or server and run the htpasswd command.
sudo apt-get install apache2-utils
htpasswd -n username
This will generate the output that we must copy in our docker-compose.yml file.
CAUTION: For the password parsing to be correct, you must duplicate all the '$' symbols. An example is attached below:
# Original output of htpasswd command
test:$apr1$OCsLF/rG$8M4P0kfjAzYolDOxVrIhJ/

# Content to copy on docker-compose.yml
test:$$apr1$$OCsLF/rG$$8M4P0kfjAzYolDOxVrIhJ/
traefik/certs-config.yaml
This file declares which certificates our Traefik instance will use to serve secure traffic. It must simply point to the container's certificate path, which in turn is linked to a directory on our host as we have declared in the docker-compose.yml. The contents are as follows:
tls:
  certificates:
    - certFile: /etc/certs/yourdomain.com.crt
      keyFile: /etc/certs/yourdomain.com.key
traefik/certs
Finally, you must upload the files yourdomain.com.crt and yourdomain.com.key to your server/VPS directory traefik/certs.
As we have declared in the docker-compose.yml, the container will have access to this directory
Starting the service
Now that we have everything configured, we can start the Docker Compose service. To do this, you can use the following command, which will allow you to see in real time the logs of the container in case there is any error (I attach you to it):
# Execute it on the treafik/ root dir
docker compose up
In order to not be attached to the container and keep it running constantly, you can use CTRL+C and execute the following command:
# Execute it on the treafik/ root dir
docker compose up -d
This will keep your container active in the background, running permanently. If you make any changes, you must stop the service and restart it:
# Execute it on the treafik/ root dir
docker compose down && docker compose up -d
Accessing the service
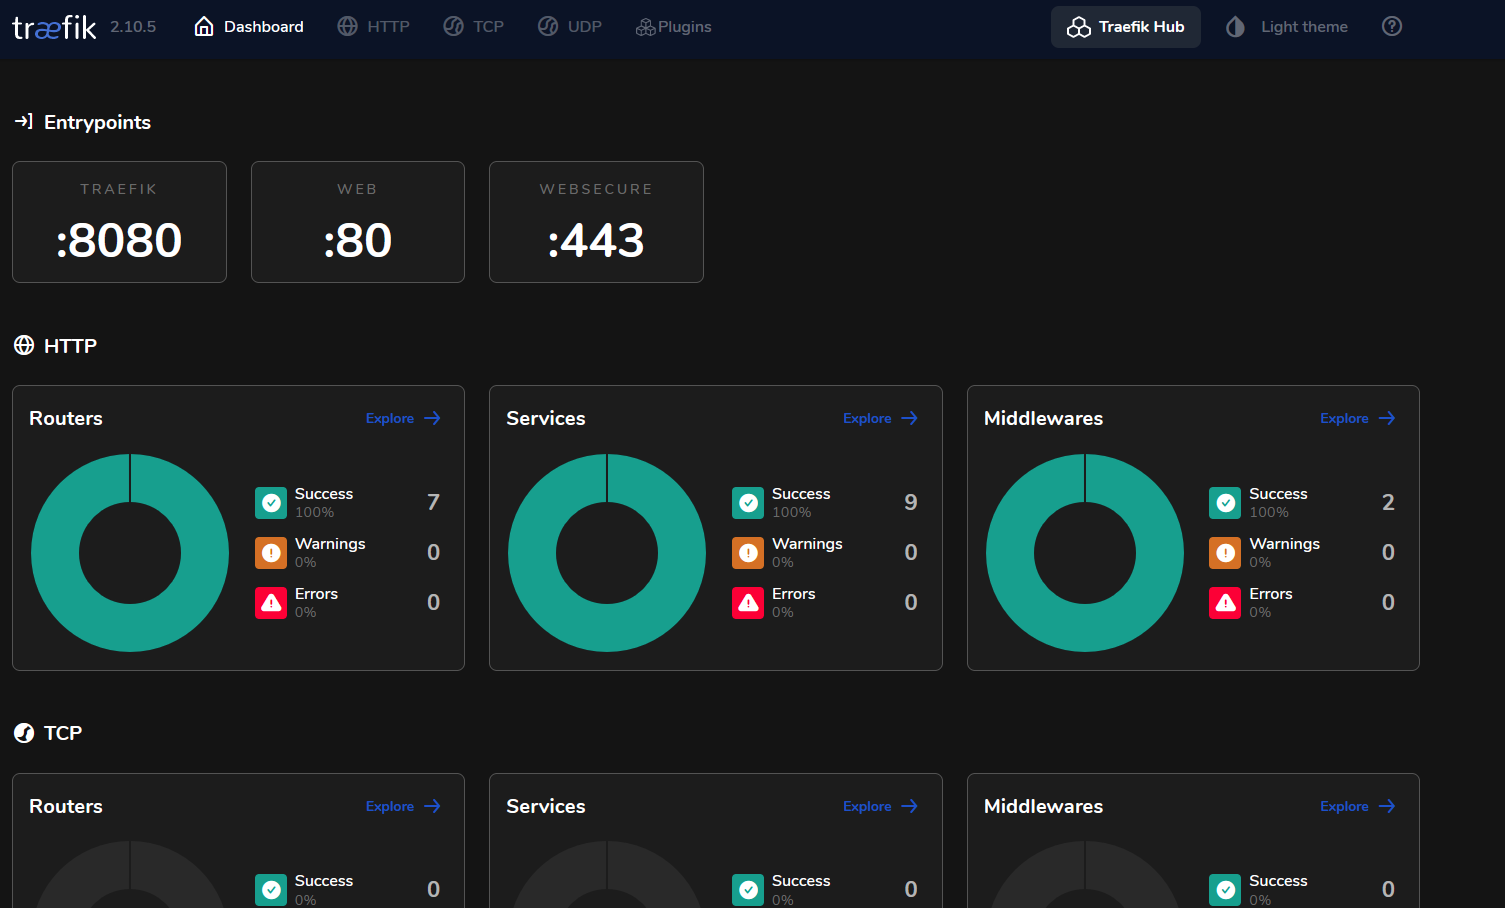
With the container running, you should now be able to access your Traefik panel via https://traefik.yourdomain.com.
Here, you should be able to see your site as protected (HTTPS/SSL) and it should ask you for login and password to access. You will need to use the username and password configured earlier for this.
If all goes well, you should be able to see something like this in the main Traefik panel.